
Automating SQL Server in Azure Part 1

1/2/2019
In the previous blog entry, we talked about the different options available for SQL Server running in a PaaS solution in Azure. Today we will focus on the IaaS solutions available.
Let’s get started! We have four different options when implementing SQL Server in an IaaS solution. The first three will be familiar if you have deployed SQL Server on-prem previously, with a couple of slight differences. We have SQL Server stand alone, SQL Server AlwaysOn Availability Groups, SQL Server failover cluster instance (FCI) , and finally SQL Server running in a container within Azure Kubernetes Service.
Over the last year I have been working with customers, many of which struggle with getting started with Azure Resource Manager(ARM) templates. What I have found is customers are far more successful if they have an example which hits at least 80% of what they need for their environment. Therefore, I have put together a series of ARM templates which include the vast majority of the configurations customers have asked for. The best part is that it is stored on Github so everyone can take advantage of the work and if they so choose contribute or ask for additional features via the Issues tab in Github.
Today I am going to focus on automating the first implementation SQL Server stand alone. So to get started you will want to head over to my GitHub pull down or fork my ARM repo. Direct link can be found here.
For those who are not familiar with ARM templates I will first walk through the series of files which are included. Once you unzip the ARM-master.zip file you will have a series of files and directories. We are focusing on SQL Server stand alone so open up the folder SQLStandAloneExistingVnet.
As the name implies, this template will allow you to create a Stand Alone SQL server in your existing domain and Vnet within Azure. Within the folder, we will find three files and a folder, each of which are described below:
- azuredeploy.json : ARM Template which describes what will be deployed.
- azuredeploy.paramaters.json : Parameter file passed to ARM template with variables defined for deployment
- DSC Folder : DSC configuration applied to SQL Server at build time
- StandAloneDeploy.ps1 : PowerShell script to aid in deploying the template
If you have never heard of Azure Resource Manager (ARM) and would like to have a high level understanding of how it is laid out check out the following article.
First, let’s review the PowerShell script to understand how we will deploy this template.
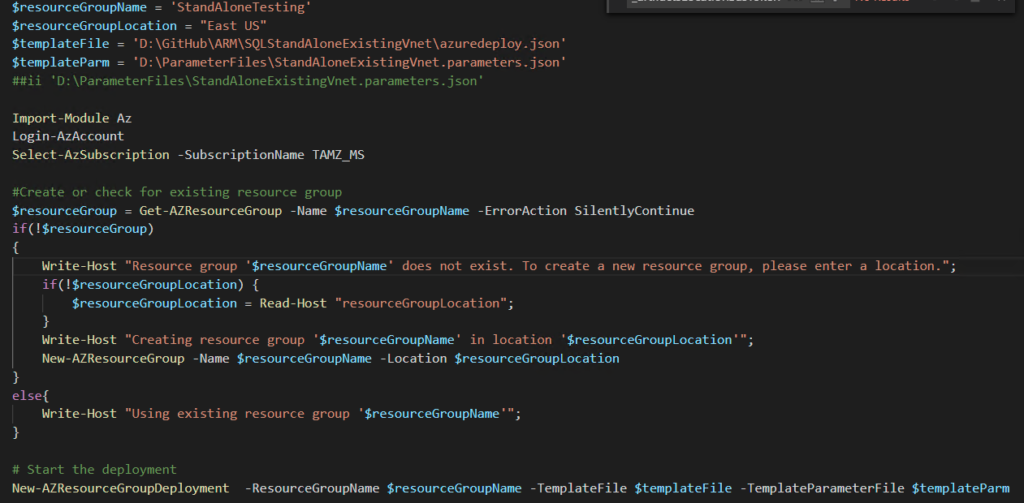
As we can see, this script has four variables that need to be defined: Resource Group Name: Name of the resource group which will be created for your deployment Resource Group Location: Location where resource group will be created. Template File: Location of the template file which you downloaded from Github. Template Parameter File: Location of the template parameter file which we will discuss next. Last item which you will want to change will be the SubscriptionName you are creating the resource group in. Currently this is not a variable however it could be made one. After the variable declaration, we see the next statement is Import-Module Az followed by Login-AzAccount. If you haven’t done ARM template development before, then you will likely not have this module available to import. No worries, you can still install the module. If you need to install, ensure you are at an elevated PowerShell prompt and type Install-module AZ. Once complete you can continue further.
After login-AZAccount, the next block of code simply checks for the existence of the resource group you asked for in the deployment. If it doesn’t exist, then it creates it.
Finally, the last line is what actually deploys the template with the parameter file you passed.
azuredeploy.parameters.json holds all the required parameters you need to pass with the template to successfully deploy. There are many other parameters that can be passed which we will cover later. Listed below are the required parameters along with a short description:
VMName : Actual Name of the machine which will be created and placed into your domain. localadminsusername: localadmin account created on the machine localadminPasswor: keyVault reference to the password. ** ExistingDomainName: your fully qualified domain name. (Ex. tamz.us) domainUserName: UserName of a domain user with the ability to add machines to the domain domainUserPassword: keyVault reference to the password. ** existingVirtualNetworkResourceGroup: ResourceGroup where your existing Virtual Network (VNet) lives. existingVirtualNetworkName: Name of the existing VNET where the new SQL Server will be placed. existingSubnet: Name of the existing subnet the new SQL will be will created in. All other parameters are defaulted within the template however they could be added to the parameters files if you would like to override the default values.
** KeyVault reference above. More and more scripts are stored in source control, and too many times it’s difficult to sanitize scripts before checking them in. As a result, all of my scripts leverage KeyVault as a store for sensitive data. If you currently don’t have a KeyVault deployed, then you will want to create a KeyVault, capture the id of the KeyVault, and place here along with the secret you would like to retrieve. If you are having a hard time finding the id, then do the following:
Click the KeyVault from the Portal Select Properties on the left menu Record the value of Resource ID azuredeploy.json is the main template which holds all of the resource definitions for the template we are deploying. I’m going to point out a few things of interest within this file. The first entry you will see that is notable is the parameters block. Each item within this block can be defined within the parameters file if the default value listed does not meet your needs. As an example, one parameter which is missing from the parameter file is sqlSysAdmins. This is the group which you would like to be granted the SysAdmins role in SQL Server. To add this to your parameter file, you simply put a comma after the } which closes out existingSubnet, and place the name and value. For example, for me it would look like the below:
“existingSubnetName”: { “value”: “data” }, “sqlSysAdmins”:{ “value”: “TAMZ\DBA” }
Any additional parameters would follow the same pattern. As we look through the remainder of the template, we will see resources such as the network interface get created as well as the virtual machine. The last resource we will see within the template is an extension called DSC. If you are unfamiliar with DSC, it stands for Desired State Configuration. If you are looking to become more familiar with it, please see some of my earlier blog posts on DSC.
The last two files we have to discuss are in the folder labeled DSC. Within this folder you will find the following files:
Standalone.ps1 : DSC configuration for SQL Server being deployed StandAlone.ps1.zip : Compressed files containing all the resources required for the DSC configuration. While in this post I won’t go into the specifics of how DSC operates, I will describe what this particular configuration will provide you. All parameters you find within the DSC configuration can be passed through the ARM template file and will automatically be passed in turn to this configuration. So what all are we doing with this script? Take a look below as I will list out all the items which are set by the configuration:
Create SQL Server Data drive and format as 64kb Create SQL Server Log drive and format as 64kb Set PowerPlan to High Performance Set TimeZone : EST by default Install SQL Server Assign PerformVolumeMaintenance Tasks to SQL Server Account Assign Lock Pages in Memory to SQL Server Account Set MaxDop based on number of cores allocated Set Max Memory based on memory allocated to machine Create Firewall rule for SQL Server While there are others things that can be set for SQL Server, these hit the top things recommended for SQL Server running in Azure. Article referenced for these settings in its entirety can be found here.
This concludes the walk through of the template. For reference, when I deploy the template in my environment I have a fully configured SQL Server after roughly 23 min. Your experience may vary depending on different factors.

Next post we will look at the AlwaysOn template, walk through the differences from on-prem to Azure, and show you how you can leverage it.
Thanks for reading and happy automating!